
Introduction
CI/CD (Continuous Integration/Continuous Delivery) is one of the most useful techniques to reduce friction between dev and ops teams and improve software delivery time. However not doing it right can have an opposite effect on the delivery process and sometimes on the team productivity and happiness.
In this article, we will create a GitLab CI/CD pipeline for a React project and walk through the optimization process exploring the most common problems, their solutions, and the trade-offs we can make to have faster pipelines and happier development teams.
The job Anatomy
Before diving deeper into pipeline optimization, let's take a closer look on how Gitlab jobs work and what are their execution phases.
When a job is created, it goes into the pending state, until a runner is available. Once the runner is available, the job gets picked.
Then the runner starts by preparing the execution environment: in the docker executor case, it pulls the image specified in gitlab-ci.yml and creates a container from the same image.
By the time the container is up, the runner clones the git repo into it and runs our script from .gitlab-ci.yml against our code.
In case we've specified artifacts or caches in our CI files, the job carries two more tasks out, for pulling and(/or) pushing some files as caches or artifacts. The files are even stored in an object storage service like S3 or MinIO or in the container filesystem itself.

The Pipeline
In Gitlab CI/CD, a pipeline is simply a collection of jobs. For our case we will work on the most basic pipeline for a node project.
Our pipeline will install our node dependencies, test the code, build it and package it as a docker image.
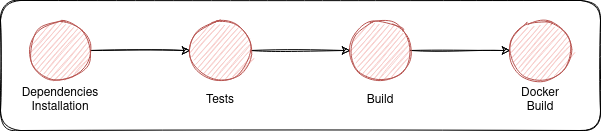
An example gitlab-ci.yml file will look something like this:
stages:
  - install_deps
  - test
  - build
  - package

default:
  image: node:lts
  before_script:
    - yarn install

Install Dependencies:
  stage: install_deps
  script:
    - yarn install
  when: manual

Test:
  stage: test
  script:
    - yarn test

Build:
  stage: build
  script:
    - yarn build
  artifacts:
    paths:
      - public

Docker Build:
  before_script:
    # to skip default before_script
    - docker info
    - docker login -u $CI_REGISTRY_USER -p $CI_REGISTRY_PASSWORD $CI_REGISTRY

  stage: package
  image: docker:stable
  services:
    - docker:dind
  script:
    - docker build -t ${CI_REGISTRY_IMAGE}/gprg:latest .
    - docker push ${CI_REGISTRY_IMAGE}/gprg:latest
Caching
The first steps
Caching is one of the most useful techniques we can use to speed-up gitlab CI jobs. The Gitlab documentation devoted an entire page to caching with a good amount of details about all the caching features and their use-cases.
In the previous gitlab-ci.yaml file we can see that we need to install yarn dependencies aka node_modules each time we need to execute a yarn command. This operation is redundant and so costly in time. For this reason it should be done at most once per pipeline execution.
To do so we'll need to cache the node_modules folder and preferably use yarn.lock file as a cache key. This way each time yarn.lock changes, the cache gets invalidated and rebuilt from scratch.
We will add the cache key to all yarn-related jobs. The new version will look something like this (The unchanged parts are omitted for brevity):
...
Install Dependencies:
  stage: install_deps
  cache:
    key:
      files:
        - yarn.lock
    paths:
      - node_modules
  script:
    - yarn install

Test:
  stage: test
  cache:
    key:
      files:
        - yarn.lock
    paths:
      - node_modules
  script:
    - yarn test

Build:
  stage: build
  cache:
    key:
      files:
        - yarn.lock
    paths:
      - node_modules
  script:
    - yarn build
  artifacts:
    paths:
      - public
...In our case the pipeline with cached node_modules are faster by more than 2 mins than the one without. The gain can be more important if you are self-hosting Gitlab on a machine with slow internet speed.
Avoiding useless work using cache policy
By default, each time a job with cache tries to pull the cache specified in its definition in gitlab-ci.yaml, then it executes the commands in the script and finally, it pushes the new changes to the files under cache:paths to the cache storage server again. We can change this behavior by changing the cache policy.
There are 3 cache policies:
push-pull(default policy): the jobs pull the cache at the beginning and push it at end of the job execution.pullthe jobs pull the cache at the beginning but do not push the changes again.push: the jobs do not pull the cache before the job execution, however they do push it at end.
In our example pipeline, only the install Dependencies job needs to update the cache, unlike the Test and Build which do not and only need the cache to be pulled.
Having that the resulting pipeline will look like this:
...
Install Dependencies:
  stage: install_deps
  cache:
    key:
      files:
        - yarn.lock
    paths:
      - node_modules
    policy: pull-push
  script:
    - yarn install

Test:
  stage: test
  cache:
    key:
      files:
        - yarn.lock
    paths:
      - node_modules
    policy: pull
  script:
    - yarn test

Build:
  stage: build
  cache:
    key:
      files:
        - yarn.lock
    paths:
      - node_modules
    policy: pull
  script:
    - yarn build
  artifacts:
    paths:
      - public
...Changing the cache policy to pull for Test and Build decreased the pipeline time by more than 30s in our case. And in some cases having the right cache policies for your jobs can make a huge difference especially if your caches have bigger sizes.
Faster caching by controlling compression
Before getting pushed or pulled, the caches (and artifacts) are compressed using the zip algorithm. And starting from version 13.6, we can use fastzip to zip/unzip our caches and artifacts. Even better we can have 5 compression levels to choose from according to the speed/compression ratio we want to achieve (slowest, slow, default, fast, and fastest)
This feature is deployed under a feature flag and should be enabled by setting the FF_USE_FASTZIP to true.
variables:
  FF_USE_FASTZIP: "true"
  # These can be specified per job or per pipeline
  ARTIFACT_COMPRESSION_LEVEL: "fast"
CACHE_COMPRESSION_LEVEL: "fast"More speed! In our case, the pipeline time drop by almost another 30s using fast compression level since the compression takes less time while the cache size does not increase drastically.
Remember it is always about trade-offs: We could use fastest instead but the size will be huge, and we will lose the time we economized from compression time, due to more upload/download time.
So if you are hosting your own runners, it would be better to experience with the different compression levels and choose the one that suits you the best. The choice will depend on how much storage you can afford, your network IO speed, and your CPU power (for compression).
For example, if you have a lot of storage and good network speed, but your machines have slow CPUs fastest can be a good choice, whereas if you have fast CPUs and less storage (or the network between your runners and your cache server is slow) slow or slower will give better results.
Caching more things using multiple caches
Until Gitlab 13.10, we could only have one cache per job. This pushed us to shove many folders and files into the same cache, which can be considered bad practice because it breaks the atomicity of caches and make the cache size very big.

Now we can have up to 4 caches per job, that we can use to cache other useful things:
- yarn cache: According to the yarn docs "Yarn stores every package in a global cache in your user directory on the file system".
In addition to node_modules, caching yarn cache can be so useful if your runners have slow internet speed andyarn installtake so much time.
When installing dependencies yarn will check its cache and only download the packages that do not figure in the yarn cache, resulting in less download time and less pipeline execution time. - Test cache(jest): In our example project we are using jest to execute our test. Jest uses cache to speed up its execution.
- Build cache: When running
yarn buildthe build tool creates a build cache and stores it somewhere in the project directory (often under.cacheor.node_modules/.cache). This cache can speed up the build drastically.
Finally, our jobs will have multiple caches each:
Install Dependencies:
  stage: install_deps
  cache:
    - key:
        files:
          - yarn.lock
      paths:
        - node_modules
      policy: pull-push
    - key: yarn-$CI_JOB_IMAGE
      paths:
        - .yarn
      policy: pull-push

  script:
    - yarn install --cache-folder .yarn

Test:
  stage: test
  script:
    - yarn test --cacheDirectory ".jestcache"
  cache:
    - key:
        files:
          - yarn.lock
      paths:
        - node_modules
      policy: pull
    - key: test-$CI_JOB_IMAGE
      paths:
        - .jestcache
      policy: pull-push

Build:
  stage: build
  cache:
    - key:
        files:
          - yarn.lock
      paths:
        - node_modules
      policy: pull
    - key: build-$CI_JOB_IMAGE
      paths:
        - .cache
        - public
      policy: pull-push
  script:
    - yarn build
  artifacts:
    paths:
- publicOne last refactor
Even though our gitlab-ci.yaml works as expected, it is not the best when it comes to readability and style. To fix that we are going to use some YAML-Fu notably yaml anchors.
# Caches
.node_modules-cache: &node_modules-cache
  key:
    files:
      - yarn.lock
  paths:
    - node_modules
  policy: pull

.yarn-cache: &yarn-cache
  key: yarn-$CI_JOB_IMAGE
  paths:
    - .yarn

.test-cache: &test-cache
  key: test-$CI_JOB_IMAGE
  paths:
    - .jestcache
  policy: pull-push

.build-cache: &build-cache
  key: build-$CI_JOB_IMAGE
  paths:
      - .cache
      - public
  policy: pull-push

# Jobs
Install Dependencies:
  stage: install_deps
  script:
    - yarn install --cache-folder .yarn
  cache:
    - <<: *node_modules-cache
      policy: pull-push # We override the policy
    - <<: *yarn-cache # This is not required if your internet speed is good or if you use a local npm registry.

Test:
  stage: test
  script:
    - yarn test --cacheDirectory ".jestcache"
  cache:
    - <<: *node_modules-cache
    - <<: *test-cache

Build:
  stage: build
  script:
    - yarn build
  cache:
    - <<: *node_modules-cache
    - <<: *build-cache
  artifacts:
    paths:
- publicAgain, we gained another 30s. And again, it is because we are working on a small project with smaller test suites and faster builds. On bigger projects caching build and test caches in Gitlab, can decrease the pipeline execution time by minutes.
Another type of cache: Docker cache
In our pipeline, we had a job where we build and push a container image to Gitlab container registry. This job is taking more than a minute when it most of the time it shouldn't.
Each time the Docker Build job runs it builds the image from scratch, which can take a lot of time depending on our build steps. To avoid that, we pull the latest image from our registry (Gitlab registry) and we cache from it in the current build:
...
Docker Build:
  before_script:
    # to skip default before_script
    - docker info
    - docker login -u $CI_REGISTRY_USER -p $CI_REGISTRY_PASSWORD $CI_REGISTRY
  stage: package
  cache: {}
  image: docker:stable
  services:
    - docker:dind
  script:
    - docker pull ${CI_REGISTRY_IMAGE}/gprg:latest || true
    - docker build
      --cache-from ${CI_REGISTRY_IMAGE}/gprg:latest
      -t ${CI_REGISTRY_IMAGE}/gprg:prod
      -t ${CI_REGISTRY_IMAGE}/gprg:latest .
    - docker push ${CI_REGISTRY_IMAGE}/gprg
This is only useful if it takes less to pull an image from your container registry than to build it from scratch. An example of this situation is when you are hosting your own Gitlab registry and your runners in the same network.
In our case, it didn't make a big difference, since it took almost the same time to pull the Nginx from the docker hub than from Gitlab container registry.
Controlling Pipelines/jobs execution flow
Pipelines should not always run
Until now, having the gitlab-ci.yaml committed into a Gitlab repository, Gitlab CI/CD will create a pipeline each time we make a change to our entire git repository. It depends on the project requirements and organization but often this is not the desired behavior since it creates many unwanted pipelines.
To specify when to run our pipelines we use workflow:rules
....
workflow:
  rules:
    - if: '$CI_MERGE_REQUEST_IID' # Run pipelines on Merge Requests
    - if: '$CI_COMMIT_BRANCH == $CI_DEFAULT_BRANCH' # Run pipelines on main branch
...Now that we have our workflow defined, let's create a branch and push it to Gitlab.
git checkout -b "workflow-rules"
git push --set-upstream origin workflow-rules
Nothing will happen, and no pipeline will be created until we create a merge request.
Jobs should not always run too
Like pipelines, we can control when a job is created and when it is not. To do so we either use only: and except or we use rules.
rules is recommended by Gitlab, since they have plans to deprecate only and except.
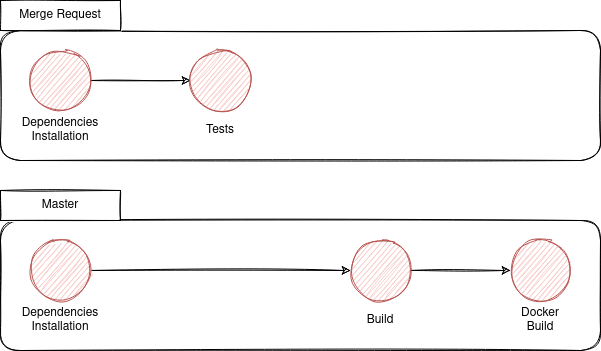
Let's suppose that in our example, we would like to run Build and Docker Build on the main branch only and Test on merge request.
Our gitlab-ci.yaml will look like this:
....
Test:
  stage: test
  rules:
    - if: '$CI_MERGE_REQUEST_IID' # Run job on Merge Requests
...

Build:
  stage: build
  rules:
    - if: '$CI_COMMIT_BRANCH == $CI_DEFAULT_BRANCH' # Run job on main branch
...

Docker Build:
  stage: package
  rules:
    - if: '$CI_COMMIT_BRANCH == $CI_DEFAULT_BRANCH' # Run job on main branch
Now when we create a merge request the created pipeline will only contain Install Dependencies and Test. In the other hand once the Merge Request is merged, the pipeline will contain Install Dependencies, Build and Docker Build.
DAG Pipelines
DAG (Directed Acyclic Graph) pipelines are one of the most useful Gitlab CI/CD features, especially for big multi-tier projects, and/or mono repos.
By default jobs in one stage are not executed until all the jobs in the previous stage succeed. However, this is not always the way things are in real projects. Enters DAG Pipelines.
Using the needs keyword we can explicitly specify the relationships between our jobs and more specifically the jobs on which we want each job to depend.
To demonstrate the use of needs we will create an additional Build that won't depend on tests, unlike the Build we already had.
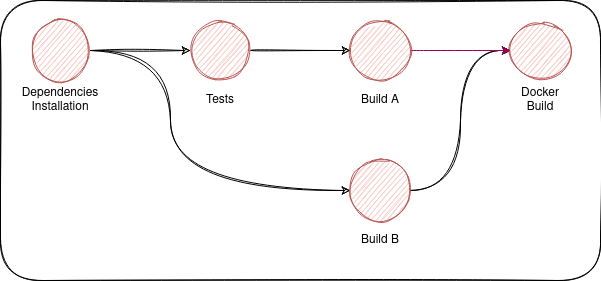
To implement the previous pipeline, we should add a needs keyword to Build B
...
Build B:
  needs: ["Install Dependencies"]
  stage: build
  rules:
    - if: '$CI_COMMIT_BRANCH == $CI_DEFAULT_BRANCH' # Run pipelines on main branch
  script:
    - yarn build
  cache:
    - <<: *node_modules-cache
    - <<: *build-cache
...When the pipeline runs, the Build B won't wait for Test to finish, it will start as soon as Install Dependencies finishes.
If you still don't get how DAG pipelines are useful, here is another example where you should use them.

Optional Needs
Optional needs are a very important feature introduced in Gitlab v13.10 to complement needs.
To understand how optional needs work, let's suppose we want to achieve the following:
- Tests Jobs run on merge requests only. The other jobs run always.
Build Adepends onTest AandBuild Bdepends onTest B.
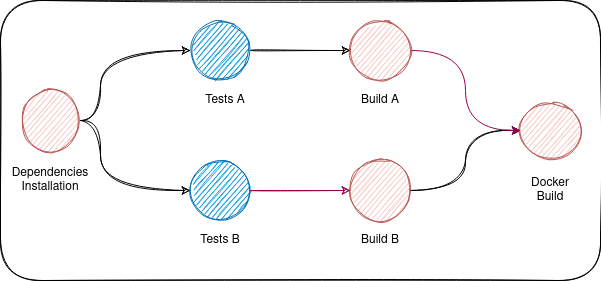
The obvious solution will be the following:
Test A:
  stage: test
  rules:
    - if: '$CI_MERGE_REQUEST_IID'
Test B:
  rules:
    - if: '$CI_MERGE_REQUEST_IID'
Build A:
  needs: ["Test A"]
Build B:
  needs: ["Test B"]
This solution will work only in case of merge requests. Otherwise, the Test jobs won't be created and the pipeline will fail since Build Jobs depend on them.
Another solution is not using DAG at all. This way the pipeline won't fail but in the merge request, Build jobs won't start until both Test jobs finish.
The better solution is to use optional needs to specify the dependency between Build and Test jobs without imposing it.
Test A:
  stage: test
  rules:
    - if: '$CI_MERGE_REQUEST_IID'
Test B:
  rules:
    - if: '$CI_MERGE_REQUEST_IID'
Build A:
  needs:
    - job: "Test A"
      optional: true
Build B:
  needs:
    - job: "Test B"
      optional: true
Miscellaneous
Always use small prebuilt local images
If you are using docker or Kubernetes executor always choose small images under the image: tag. Having smaller images the runner takes less time preparing the environment especially if the image changes a lot and needs to be pulled from elsewhere.
Another thing you should consider if you are hosting Gitlab in your own servers is to store the images used in CI in a local container registry (You can create a repo for all your images and use Gitlab CI to update the images once in a while). This way pulling them will be faster, and more secure.
default:
image: node:lts-alpineThis is so important! A change this easy dropped the pipeline execution time by 1.5 minutes.
Design your pipelines well
Take your time to think about the features you want to have in your pipeline, and what are the ways available to implement them. Most of the time, there are many ways to do things, and you should pick the best and the most performant and scalable.
Another thing you should keep in mind when designing CI/CD pipelines is debuggability (if that's a word), which means when something does not work properly you should be able to investigate the problem easily.
The last thing I want to mention is avoiding delaying feedback. The pipeline should fail when it should fail! If there is something wrong it should be detected earlier in the pipeline.
Write better Dockerfiles
If you are using Docker to package your application, try to make your images as small as possible, and try to make the most out of the Docker's cache. Our friends at Padok have discussed this in their excellent Gitlab CI/CD article.
Again! Always use small base images!
Don't use Docker
This may seem a bit weird, but it is one of the most relevant points to consider when trying to optimize your CI/CD pipelines.
In order to build images using Docker in Gitlab using the docker or Kubernetes executor. you should spin up two containers and wait for the docker daemon to be ready, then start building your images. These operations take a lot of time from the initialization part.
To avoid all of this you can use alternative image builders like Kaniko or Buildah.
In our example using buildah instead of Docker, brought us more than 30s
Docker Build:
  before_script:
    # to skip default before_script
    - buildah info
    - buildah login -u $CI_REGISTRY_USER -p $CI_REGISTRY_PASSWORD $CI_REGISTRY
  stage: package
  image: quay.io/buildah/stable:latest
  script:
    - buildah build
      -t ${CI_REGISTRY_IMAGE}/gprg:prod
      -t ${CI_REGISTRY_IMAGE}/gprg:latest .
    - buildah push ${CI_REGISTRY_IMAGE}/gprg
Interruptible pipelines
When you a pipeline is running on a specific branch and you run another one, most of the time you will want to stop/interrupt the one already running.
To do so you should label all its job or at least the one you want as interruptible. This is useful to limit the number of jobs running at the same time.
Install Dependencies:
  interruptible: true
  ...

Test:
  interruptible: true
  ...

Build:
  interruptible: false
  ...
A new pipeline on a branch will cancel the previous one if it running Install Dependencies or Test job. Once Build starts running the old pipeline can't be interrupted.
Conclusion
Although applying all these small tips and tricks one at a time, made our pipeline much faster: the pipeline time went from 08:14 to 02:55 (around 280% faster), there is still room for improvement.
In fact, Gitlab CI/CD offers more features like self-hosted runners and parallel jobs that we can be leveraged to improve the performance even further.
Thank you for reading! Happy learning!